Homework
Friday, April 22, 2011
est
I'm loving this new Australian online shelter/lifestyle magazine. Lots of drool inducing material and the photography is outstanding.
Sunday, April 17, 2011
Adventures in Block Printing
This was a satisfactory experiment for two reasons: I've been wanting to try my hand at block printing, plus I've been itching to recreate this Herb Lubalin ampersand since I first saw a picture of it at Wary Meyers . Not having any luck locating on the internet an example of the type that I could print out and copy onto the block, I made an attempt to draw the ampersand myself. The outcome of my efforts isn't perfect, but after spending hours drawing and revising, I decided I was close enough. To my suprise, carving the block was far less time consuming.
Not having any printing ink at home, I excitedly broke out my stash of acrylic paints when I arrived at the point of printing. I watered down the paint to make it more ink-like, and not in possession of a brayer, I rolled it on the block with a foam roller. Well, the paint stuck a bit causing the paper to tear slightly, but the bigger disappointment was the realization that the printed image was backwards. Yep, it didn't occur to me that I needed to carve the image in reverse. Doh!!! Back to Hobby Lobby I headed. I returned home with additional carving material, a brayer, and some proper ink.
The second carving is actually my third drawn version of the ampersand. The first carving was copied from my second version. I'm thinking I like the second version better, so I might be carving another Lubalin ampersand. Regardless of subject material, this block printing thing could become addictive.
 |
| Dharma Trading Company Tutorial |
I'm really wanting to print on fabric, and in researching for information on fabric inks I came upon this great block printing tutorial. As one would expect, there's a wealth of information on block printing to be had on the internet, but the Dharma Trading Company tutorial is one of the better that I've seen. As back up I've ordered Lena Corwin's book, Printing by Hand: A Modern Guide to Printing with Handmade Stamps, Stencils, and Silk Screens. I've been eying her book for a while now, and I can't wait for it to arrive. I'm super excited to be delving further into block printing.
Tuesday, April 12, 2011
Road Kill
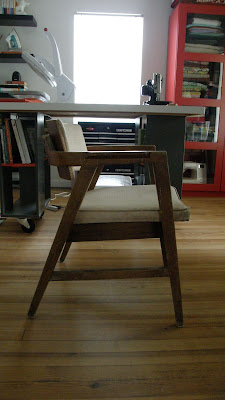
I found this chair sitting at a dumpster last Friday. Its side profile caught my attention as I was driving past it, and I have been consumed with refinishing it since I brought it home. Despite its obvious abuse and neglect, the chair is very solid.
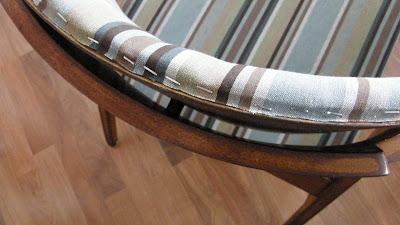
It's not completely finished, but it's close enough for some pictures. I still have to glue decorative braiding around the top's padding so the staples will be hidden, and there are a few other details that need attention. The upholstery fabric came from my stash. It's a pretty safe choice, but it was economical and fitting of the chair's style. Mostly I shopped my stash because I had already shelled out $15 for new foam and another $15 for a wood repair kit. Although a yard of fabric will easily cover the upholstery, I couldn't justify spending yet another $20+ for a chair that I don't really need. All of these little random projects can quickly add up. Not to mention, they're time sucks. With that said, I'm very pleased with the outcome of this project. While the finish is far from perfect, it certainly is way better than where I started.
An identifying emblem and a paper production tag on the chair led me to the manufacturer, The Gunlocke Company. Now I'm wondering if this chair is also a Gunlocke. Wouldn't that be cool?
Tuesday, March 22, 2011
Project Bedroom
Lately I feel as though my life is a continuous loop of projects. With the staple gun handy after recovering the sewing bench, I decided to take on my headboard. This has been on my mind for a few months now. When I hung the headboard, I covered quite a few screw holes in the wall that I opted to fix at a later date. They weren't going to be visible, and I was in a rush to get my bedroom together. Now I've decided to hang the headboard lower on the wall, so I have additional wall damage to address. With that revelation, it seemed like a good time for me to suck it up and pull out the Spackle. Can you see where I'm going here? Since I'm going through the trouble to properly patch my wall, a couple coats of fresh paint are in line. Finally, I needed to come up with a plan to remedy the lack of matching bedding for my newly recovered headboard.
Working within a minuscule budget, here's what I have so far:
Stay tuned...
Working within a minuscule budget, here's what I have so far:
| Summer Quilt Cover |
 |
| Pillow Cases or Shams |
 |
| The Headboard |
 |
| Not Too Matchy Matchy |
 |
| Existing Ikea Wardrobe |
 |
| Maybe |
 |
| Detail |
 |
| Maybe |
 |
| Inspiration |
Sunday, March 20, 2011
Secrets from a Stylist via the Internet
I gave up my Direct TV service months ago, figuring that I could better spend the money elsewhere. There are things I miss about satellite/cable television, but I'm doing fine with the cheapest Netflix subscription and Hulu. One program that I really regretted not being able to view is Emily Henderson's Secret from a Stylist. It airs Saturday evenings on HGTV. I still had the dish when Emily won Design Star, and I felt that eventually there would be a way for me to catch up on her new show sans the monthly satellite bill. So I was thrilled to find through reading her blog, Emily's show is available for viewing here on HGTV's website. Actually, there's a whole bunch of shows to check out on HGTV's website. Gotta love the internet!
Monday, March 14, 2011
Sewing Bench
I've had this bench and the matching sewing machine cabinet for quite some time. The spindly legs of the set give it a lot of character. I purchased a Singer 301 sewing machine, found on craigslist, and the cabinet and bench were included. I don't have room for the cabinet, but decided there had to be somewhere that I could use the bench. So here it is after spending way too much time in the process of being sanded. Painting is going to be no less time consuming. I could tell already at the early stage in which these pictures were taken. It will take three coats to cover it. The paint is Rustoleum's Safety Yellow oil paint, leftover from this project. As oil paint is being used, each coat will have to be spaced out to allow for drying time. It may be optimistic of me to promise after pictures within the next week, but I'm setting goals.
The top of the bench will get reupholstered in a durable commercial grade upholstery fabric that I found at Walmart. The fabric is in medium gray with a woven honeycomb texture. I am super excited about how cute it's going to be when I get done.
In other news, my sewing time took a hit when I embarked upon the above mentioned project. I did, however, find time to hit up Hobby Lobby on Saturday and take advantage of their Simplicity Pattern sale. Then yesterday I took advantage of the fine weather and scrubbed my front porch and porch furniture. Doing so made me feel a little less guilty about spending hours sanding a silly little stool.
Monday, March 7, 2011
The Weekend Blouse Muslin
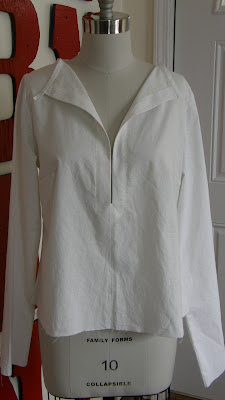
I cut the medium as printed. The construction is pretty simple. I did some research beforehand so I expected the sleeves to be long, the neck opening to be low cut, and the overall length to be short-ish. All of these issues were present on my muslin. None of these issues will be difficult to remedy.
The last two pictures show how I used stitch witchery for the bias binding, to set it in place before the final row of stitching. A very narrow strip pressed into the seam allowance does the trick. It does take a little extra time, but the effort pays off with a very neat finish.
You'll be seeing more versions of this blouse being made, soon.
Saturday, March 5, 2011
Weekend Sewing
Finally, I'm feeling some sewing mojo coming on. The Weekend Blouse in Heather Ross' Weekend Sewing looks like the perfect project. I'm going to start with a muslin and take it from there. Walmart's fabric department has been good to me lately and I have all kinds of goodies to play with.
Saturday, February 26, 2011
My Bedroom Late February 2011
The peg rail is up. I still have some touch-up painting to finish.
It's about time for a headboard recover and the expected domino effect might forever retire the bedroom's current look. I decided to take some pictures for posterity's sake.
Subscribe to:
Comments (Atom)


